29 Mar How To Drive Traffic To Your Website With Pinterest
 Getting noticed on Pinterest isn’t easy, even when your target market is pinning every day and seems to share all sorts of content but yours. If you want to get noticed on busy and bright Pinterest feeds, you need to create a winning formula for engaging content that looks great on Pinterest and will drive traffic back to your site. But how exactly do you do that? Read on for the best tips for creating the pin-worthy content for Pinterest!
Your Content Needs to Be Relevant
We’ll start with the most important tip anyone can give you: People pin content that is relevant to their needs and desires, so anything you pin needs to be something that helps your readers, otherwise they aren’t going to be interested! This means that when you are creating blog content with the future plan to pin it in pinterest, it needs to be something that your readers will find interesting and useful.
For example, if you are a yarn company or a yarn dyer and most of your readers are knitters, what are some of the most common problems that affect your typical reader? Do they struggle to match the right yarn with the right pattern? Do they like to knit garments but have a difficult time getting them to fit the way they would like? If so, posts that help knitters substitute your yarn for other patterns would be a great idea; you could also discuss garment construction and different types of fibers, or share tips for measuring garments that fit well to get a better idea of the measurements and fit needed in a knitting pattern.
Multiple posts that help your target audience solve their problems builds trust with your brand and products, and keeps people coming back. When a post has great information, it is more likely to get pinned to Pinterest – and more importantly, repinned!
Pinterest-Worthy Images and Graphics
Your posts need to have bright, clear and attractive photography and text. You know this already, but what does that really mean?
Keeping with our knitting example, let’s say you are taking photos of a finished knit. The images most likely to resonate with your target audience will be to show the knit being worn by a human, and in a natural setting. Research has shown that when people view photos of nature, their attention and cognition are improved. In a nutshell, people respond to natural images better than they do to photos taken indoors, and they are also more likely to look at the photo longer and view it more favorably. Combining the natural element with showing a knit on a human rather than on a mannequin, it is easier for someone to imagine how it might look on themselves, and they feel more rapport with the knit.
If you are selling yarn, then showing beautiful finished knits from your yarn goes a long way to improving sales. Even if you aren’t showing a finished knit, you can show your products in a ‘lifestyle’ situation, such as a crafting environment or a work room, or a project in progress artfully resting on a chair in a craft room.
Showing materials in an idealized environment helps encourage crafters to view your products as something relaxing, something that is in line with the way the want their crafting life to look and feel. Aligning your visual brand with the those crafting goals of your target audience is the cornerstone to creating good visual content that will get pinned again and again (and again!) on Pinterest, generating more traffic to your site.
Your photos are the images that people will associate with the content, and in our visually-driven environment, your photos matter as much or even more than the actual content.
Proper Image Dimensions & Alt Text Descriptions
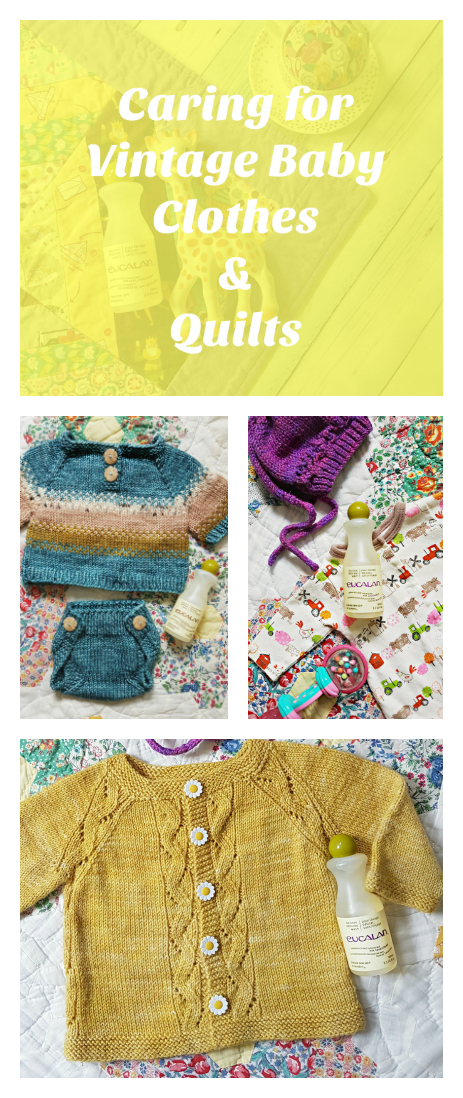
Vertical images are absolutely necessary to creating a stand-out Pinterest image. Vertical images take up more space and are easier for viewers to see, not to mention they look better on mobile screens. The ideal aspect ratio is 600 pixels wide x 900 pixels high, but you can make your images longer by creating tiled images, such as 3 images stacked together. This is a common technique in recipe posts, which will often show an image of a recipe, then a center block of text that says what the recipe is, followed by another image of the finished recipe. This format is less common in the crafting world, but still very usable if you want an extra-long image to get more visibility on Pinterest. Example:

The above is pretty and calming, but in the busy Pinterest boards this low-contrast horizontal photo in muted shades is not going to attract the eye as easily as something like this:
Lots of color and clear text that tells the viewer exactly what the content is about helps viewers get a great idea of what this pin is about quickly, and the photos are calming but still bright and visually interesting.
There’s also no rule against pinning different images to Pinterest from the same post. This helps maximize exposure without looking like the same content, and can give you insights to the types of images and pins that your ideal customers prefer. When you are creating images and graphics for your posts, keep the sizes for Pinterest in mind – and don’t forget about the alt text!
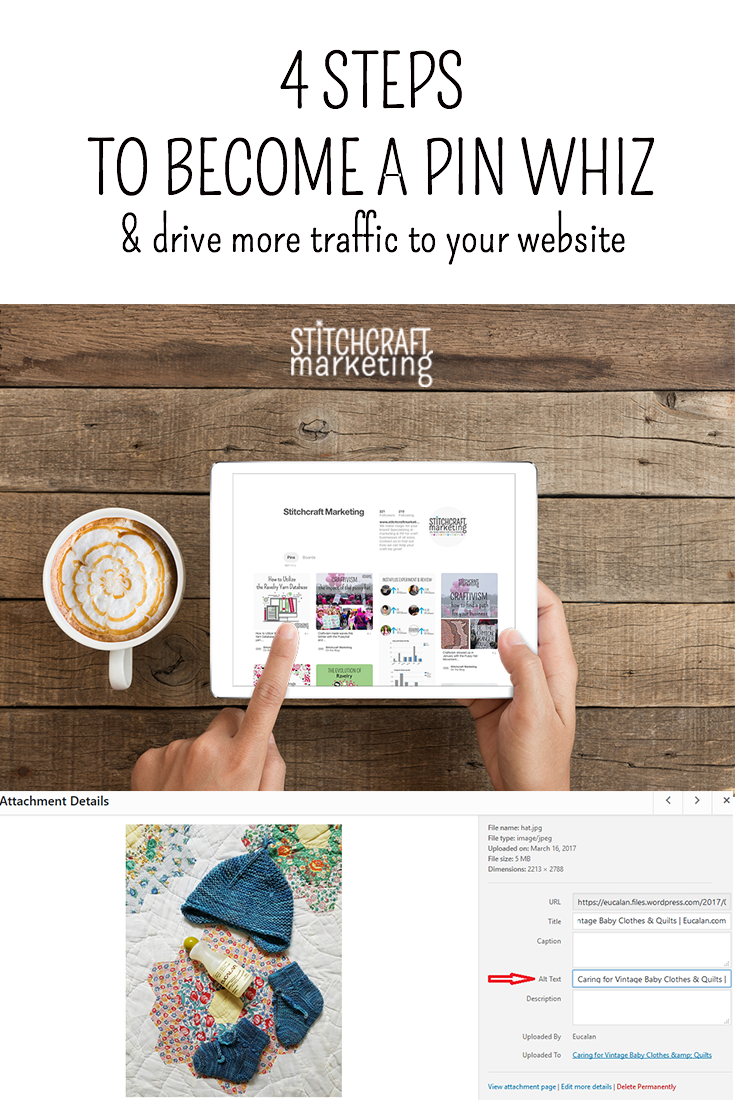
What’s alt text, you ask? Alt text is when you upload an image to your blog or website, and the right hand panel that contains information about the image – say, where you type the name of the image file, etc., has a box for alt text. This is what displays on your Pin. When you pin something to Pinterest, the description of the pin is auto-populated by whatever is in this alt text box. Take a moment to type in the relevant information: the subject of your blog post that includes relevant keywords, as well as the name of your business and blog.
Repin!
So you wrote a brilliant blog post full of useful content and made gorgeous images that are completely amazing, and you’ve pinned it to Pinterest. Job done, right?
Wrong. You need to re-pin your pins. Content is easily pushed to the bottom of a feed based on the time when posted, the number (or lack thereof) of repins, and also depends on how many other accounts your followers are also following.
You should be re-pinning your content on a regular basis, as well as other relevant content that is not exclusively from your site. Having multiple boards that can host crossover content is helpful for this, such as having a board for ‘Shawls and Cowls’, and also having a board for ‘Spring Knits’ – that way, it’s easy to repin the same post about a shawl to both boards. But even if you don’t have crossover potential in your boards (we can talk more about your boards another time), you can repin the same pin to the same board. Depending on how often you pin new content, repinning older pins every 2-3 weeks ensures that all your hard work is getting maximum exposure through your followers.
Tip: Don’t go back to your original blog post and pin from that again, Go to the pins you’ve already pinned and re pin them again. Every time a pin is repinned, it adds to the counter just below the right hand corner of the image. The more pin counts a pin has, the more likely it is to get shown in feeds, particularly when people are searching keywords, such as ‘spring shawl knitting pattern’. Even if you are the only one pinning the image at first, by repinning it every 2-3 weeks, you will increase the pin count and it will slowly increase exposure for that pin and increase the likelihood that it gets pinned by others, as well. Important: This only works if you are also pinning other content that is not just from your website, otherwise your boards are going to look like a commercial for your content, which is not going to attract repins! You shouldn’t be able to see the same pin on your board without scrolling down.
Happy Pinning! If you are looking for content on how to get started with Pinterest for your craft business, check out our previous Pinterest post here. And remember, if all of this feels like it’s too much, why not contact us and ask about our Pinterest Power Up Program where we do all of this work FOR you?


No Comments